Ceci est une ancienne révision du document !
CCTV disco
- Porteur du projet : Boris arouimi
- Fichiers utiles : mettre un lien vers un code ou un fichier
Note d'intention
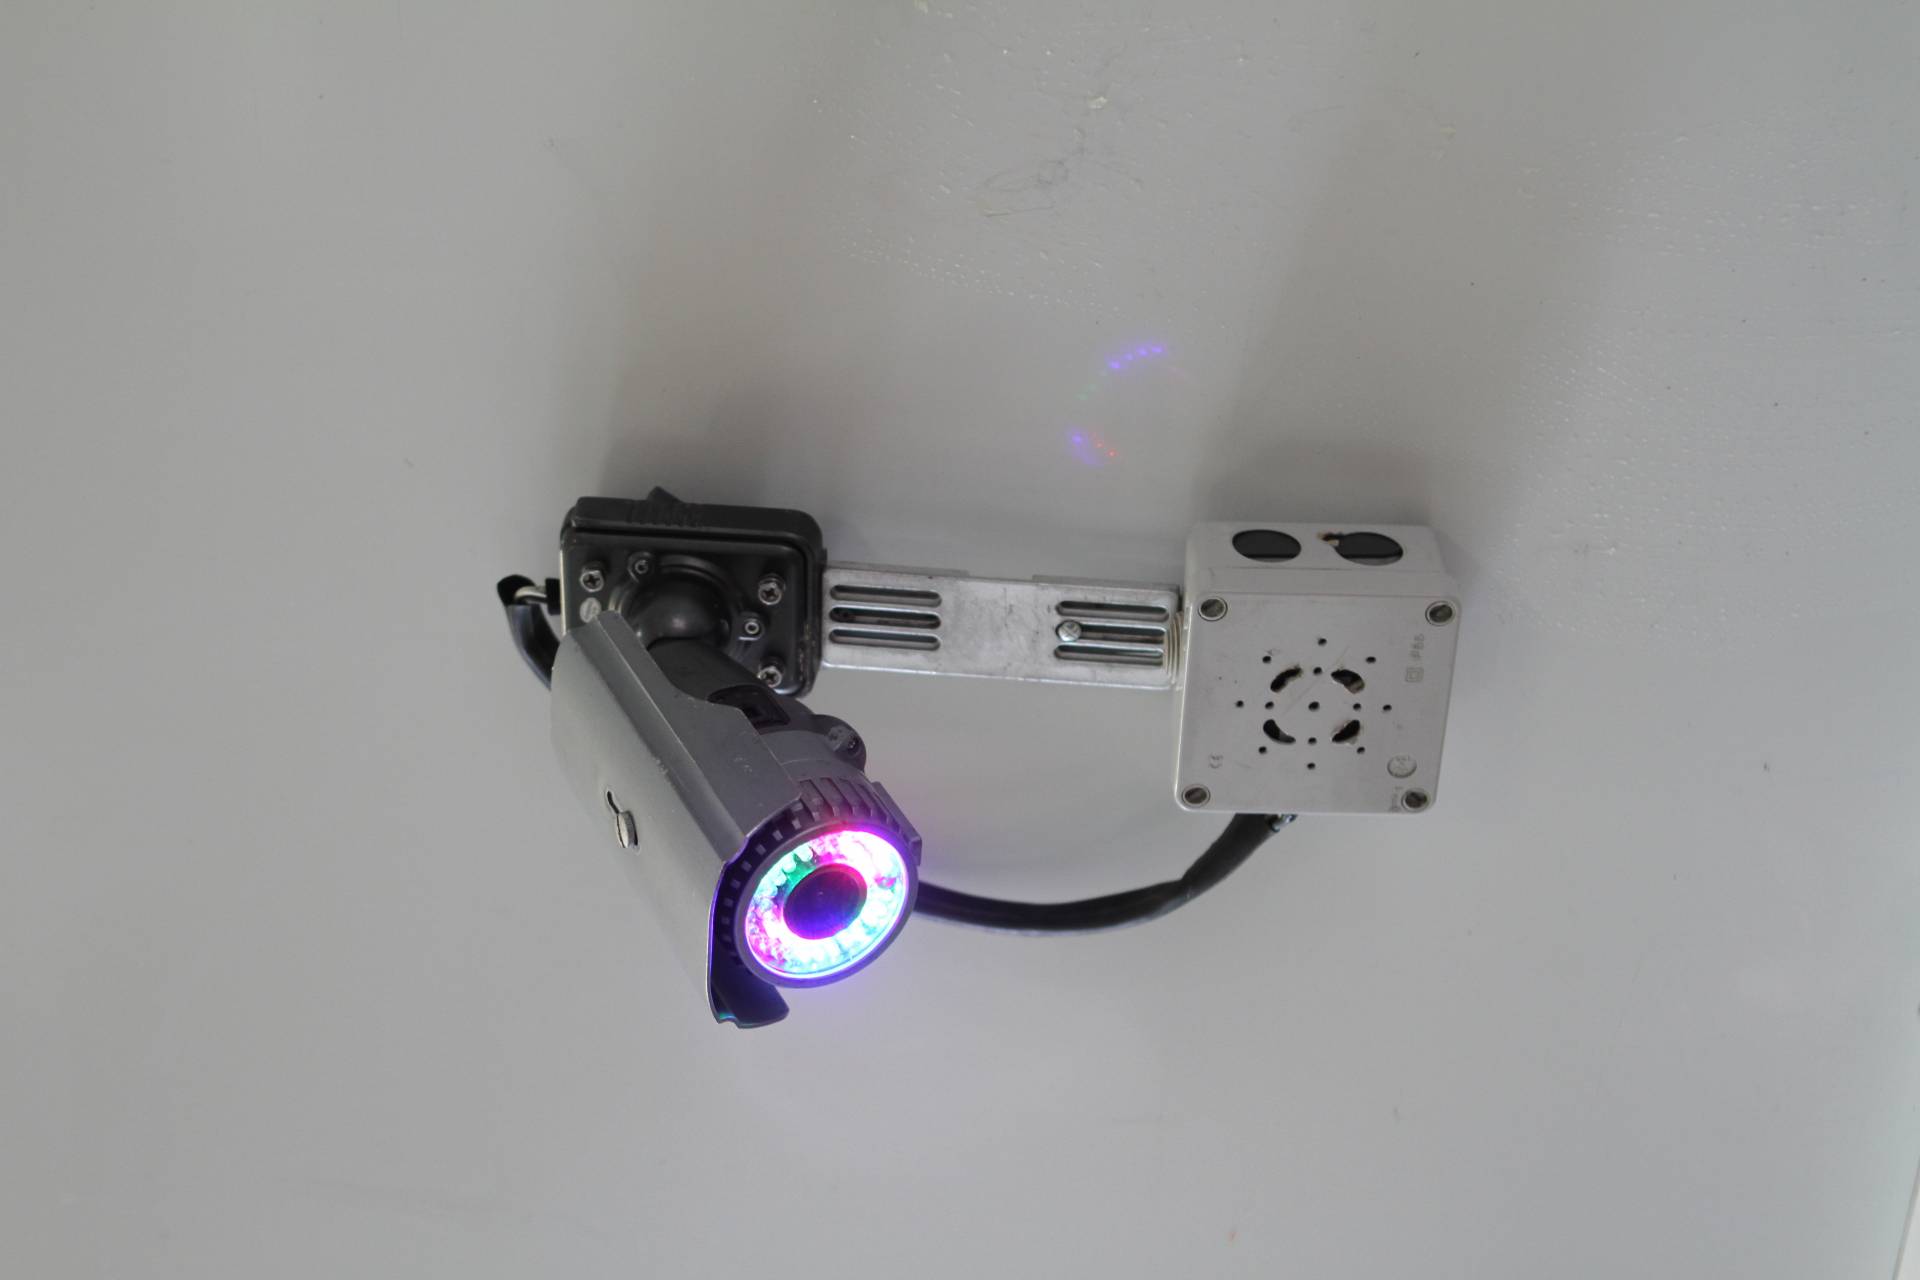
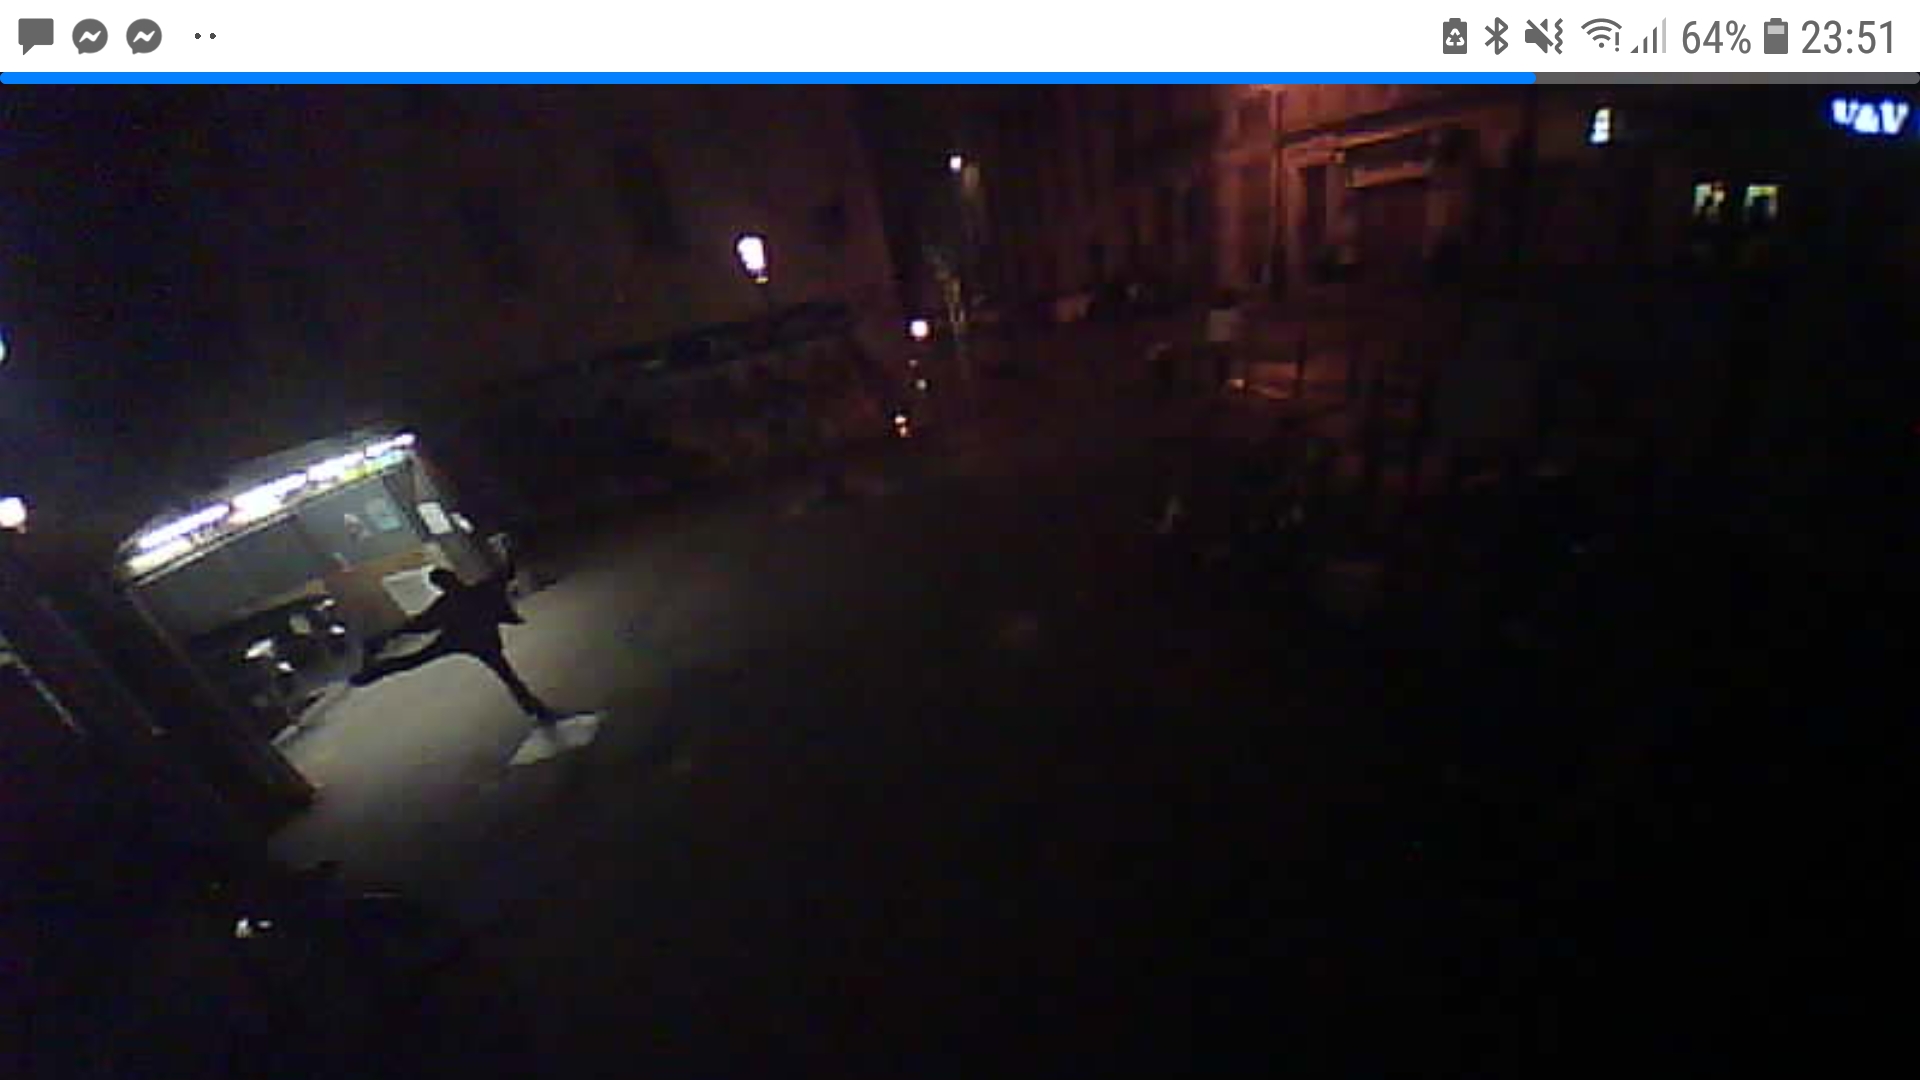
Une camera de video surveillance declenchant son et lumiere au passage des passants. La camera filme l'instant festif.

Références et liens
- Tutoriel ESP8266 :
Notes techniques et matériaux
- ESP32 cam Chez amazon
la camera envoie un flux video en wifi…eventuellement avec Motioneye (sur linux) on peut ajouter des fonction de detection mouvement/face etc… mais c'est sur linux et complexe.
- ESP8266 : Permet de commander en wifi l'allumage de LED et d'un module mp3 via une page web.
- Lecteur Redmp3 Amazon (se declenche avec une arduino ou esp..) necessite une carte micro SD et necessite un ampli et enceinte pour faire
 un son assez puissant…. ou enceinte bluetooth…batterie integrée. Fonctionne avec librairie Redmp3.h
- Jumper
- Breadboard
- Powerbank et peut être booster…
- Enceinte Bluetooth si besoin son fort
Esp8266 page web controle
Voir part 1 : https://randomnerdtutorials.com/esp8266-web-server/
- Dans arduino IDE ajouter http://arduino.esp8266.com/stable/package_esp8266com_index.json dans fichiers /preferences
- Ensuite dans outils/Gerer les bibliotheque ajouter ESP8266
- choisir Outils/type de carte : LOLIN(WEMOS) D1 D2 Mini
- Et utiliser le code fourni sur la page en mettant votre ssid et mdp de votre wifi…
Attention les GPIO du WEMOS D1 sont pas les meme que les numero de pins : voir Pinout diagram ici : https://randomnerdtutorials.com/esp8266-pinout-reference-gpios/
Code
Pour l'instant juste un code qui crée une page internet avec 2 boutons controlant les GPIO4 et 5.
/*********
  Rui Santos
  Complete project details at http://randomnerdtutorials.com
*********/

// Load Wi-Fi library
#include <ESP8266WiFi.h>

// Replace with your network credentials
const char* ssid     = "Artnum";
const char* password = "artnum123";

// Set web server port number to 80
WiFiServer server(80);

// Variable to store the HTTP request
String header;

// Auxiliar variables to store the current output state
String output5State = "off";
String output4State = "off";

// Assign output variables to GPIO pins
const int output5 = 5;
const int output4 = 4;

// Current time
unsigned long currentTime = millis();
// Previous time
unsigned long previousTime = 0;
// Define timeout time in milliseconds (example: 2000ms = 2s)
const long timeoutTime = 2000;

void setup() {
  Serial.begin(115200);
  // Initialize the output variables as outputs
  pinMode(output5, OUTPUT);
  pinMode(output4, OUTPUT);
  // Set outputs to LOW
  digitalWrite(output5, LOW);
  digitalWrite(output4, LOW);

  // Connect to Wi-Fi network with SSID and password
  Serial.print("Connecting to ");
  Serial.println(ssid);
  WiFi.begin(ssid, password);
  while (WiFi.status() != WL_CONNECTED) {
    delay(500);
    Serial.print(".");
  }
  // Print local IP address and start web server
  Serial.println("");
  Serial.println("WiFi connected.");
  Serial.println("IP address: ");
  Serial.println(WiFi.localIP());
  server.begin();
}

void loop(){
  WiFiClient client = server.available();   // Listen for incoming clients

  if (client) {                             // If a new client connects,
    Serial.println("New Client.");          // print a message out in the serial port
    String currentLine = "";                // make a String to hold incoming data from the client
    currentTime = millis();
    previousTime = currentTime;
    while (client.connected() && currentTime - previousTime <= timeoutTime) { // loop while the client's connected
      currentTime = millis();
      if (client.available()) {             // if there's bytes to read from the client,
        char c = client.read();             // read a byte, then
        Serial.write(c);                    // print it out the serial monitor
        header += c;
        if (c == '\n') {                    // if the byte is a newline character
          // if the current line is blank, you got two newline characters in a row.
          // that's the end of the client HTTP request, so send a response:
          if (currentLine.length() == 0) {
            // HTTP headers always start with a response code (e.g. HTTP/1.1 200 OK)
            // and a content-type so the client knows what's coming, then a blank line:
            client.println("HTTP/1.1 200 OK");
            client.println("Content-type:text/html");
            client.println("Connection: close");
            client.println();

            // turns the GPIOs on and off
            if (header.indexOf("GET /5/on") >= 0) {
              Serial.println("GPIO 5 on");
              output5State = "on";
              digitalWrite(output5, HIGH);
            } else if (header.indexOf("GET /5/off") >= 0) {
              Serial.println("GPIO 5 off");
              output5State = "off";
              digitalWrite(output5, LOW);
            } else if (header.indexOf("GET /4/on") >= 0) {
              Serial.println("GPIO 4 on");
              output4State = "on";
              digitalWrite(output4, HIGH);
            } else if (header.indexOf("GET /4/off") >= 0) {
              Serial.println("GPIO 4 off");
              output4State = "off";
              digitalWrite(output4, LOW);
            }

            // Display the HTML web page
            client.println("<!DOCTYPE html><html>");
            client.println("<head><meta name=\"viewport\" content=\"width=device-width, initial-scale=1\">");
            client.println("<link rel=\"icon\" href=\"data:,\">");
            // CSS to style the on/off buttons
            // Feel free to change the background-color and font-size attributes to fit your preferences
            client.println("<style>html { font-family: Helvetica; display: inline-block; margin: 0px auto; text-align: center;}");
            client.println(".button { background-color: #195B6A; border: none; color: white; padding: 16px 40px;");
            client.println("text-decoration: none; font-size: 30px; margin: 2px; cursor: pointer;}");
            client.println(".button2 {background-color: #77878A;}</style></head>");

            // Web Page Heading
            client.println("<body><h1>ESP8266 Web Server</h1>");

            // Display current state, and ON/OFF buttons for GPIO 5
            client.println("<p>GPIO 5 - State " + output5State + "</p>");
            // If the output5State is off, it displays the ON button
            if (output5State=="off") {
              client.println("<p><a href=\"/5/on\"><button class=\"button\">ON</button></a></p>");
            } else {
              client.println("<p><a href=\"/5/off\"><button class=\"button button2\">OFF</button></a></p>");
            }

            // Display current state, and ON/OFF buttons for GPIO 4
            client.println("<p>GPIO 4 - State " + output4State + "</p>");
            // If the output4State is off, it displays the ON button
            if (output4State=="off") {
              client.println("<p><a href=\"/4/on\"><button class=\"button\">ON</button></a></p>");
            } else {
              client.println("<p><a href=\"/4/off\"><button class=\"button button2\">OFF</button></a></p>");
            }
            client.println("</body></html>");

            // The HTTP response ends with another blank line
            client.println();
            // Break out of the while loop
            break;
          } else { // if you got a newline, then clear currentLine
            currentLine = "";
          }
        } else if (c != '\r') {  // if you got anything else but a carriage return character,
          currentLine += c;      // add it to the end of the currentLine
        }
      }
    }
    // Clear the header variable
    header = "";
    // Close the connection
    client.stop();
    Serial.println("Client disconnected.");
    Serial.println("");
  }
}
Photos et médias
Code pour afficher les images du projet :
 |  |  |
 |  |